显示标签为“PowerPoint to video”的博文。显示所有博文

2009年3月13日星期五

How to Share your PowerPoint Presentations in Multiple Ways

Many of us make PowerPoint presentations, no matter it is for family use, business use or education use. But not lots of us know that there are multiple ways to share PowerPoint presentations. The most common way to send presentations to others may through email or put it on a server somewhere for access. You may also package your presentation to CD for the members using PowerPoint viewer only.
But what if you want to
-> Run a looping presentation on a kiosk or at a tradeshow where PC is not available
-> Send the presentation to people who may not have PCs
-> Burn the presentation onto a DVD disc for distribution
-> Et cetera…?

Then it becomes a harder work. So how can you exactly share your information in the PowerPoint presentation? Here are some solutions for you.
1. Turn the presentation into a video to view on portable devices or website
Video is a media which could be broadcasted through many players. It can display your presentations in a more vivid way. With PowerPoint in video format, it is easy for uploading to your own blog and websites. Even there is no PowerPoint installed computers, you can also view your presentations through iPhone, iPod and all kinds of media player.


If take full advantages of PowerPoint, product advertisement can also made with it. Then with the PowerPoint product advertisement in video format, you can upload it to websites for more people to get familiar with your products.
As to the tools that can help convert a PowerPoint presentation to video, there are many programs out there. Unfortunately, I haven’t tried all of these. But here is one that looks promising. Although it is not free, if it does what you want it is worth looking into: PPT2Video Converter. For more ways about how to convert PowerPoint to video, you can click here.

2. Save and store PowerPoint presentation in CDs for distribution or broadcasting
If you have made precious photo albums with PowerPoint, saving them onto a CD would be meaningful. Family genealogy and other interesting events can all be widely shared with other family members who have no PCs and stored for long term preserve.
Useful courseware made with PowerPoint can also be distributed to fellows and students after being burned to CD/DVD.
Besides, PowerPoint product advertisement if saved in CD, it is possible to be viewed on a kiosk or at a tradeshow when there is no PC.

For programs to burn PowerPoint to CD, there is always Camtasia that will turn a PPT into a video/audio presentation, then with another program to make the video/audio presentation into a DVD. But if just for the function of burning PowerPoint to DVD, there are some better choices such as these ones: http://ppt-to-dvd.com/ppt2dvd/overview.html ; http://ppt-to-video.com/powerpoint-to-dvd-overview.html .
If you want to learn more ways about how to burn PowerPoint to DVD, you can click here.

3. Convert PowerPoint presentations to web-accessible presentations
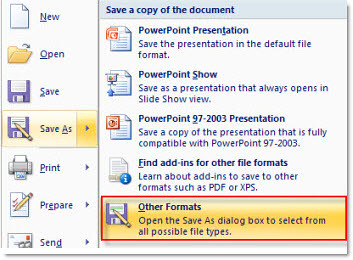
There are a lot of ways to do this. One of them is converting PowerPoint presentations to HTML version. Open your PowerPoint first, and then click Save As in the Office Button. In the drop-down menu of Other Formats, choose Webpage.


Another effective way to do this is to upload your PowerPoint to video sharing websites such as YouTube. For more notes about how to share PowerPoint on YouTube, you can click here.

The next time you want to share your PowerPoint with others, don’t bother too much then. Just take the above suggestions into consideration. And use PowerPoint to boom your sales if necessary.


2009年2月16日星期一

5 Ways to Convert PowerPoint to Video

Benefits of PowerPoint
PowerPoint is a powerful presentation application which is very commonly used by lectures, businessmen, students, trainers, etc. It is easy to use and featured with a lot of functions to create interesting and dynamic slide presentations. This has made it widely accepted and utilized.

Benefits of Video
Video is powerful because it’s demonstrative, clearly depicting procedures, techniques or visual information such as charts and graphs. Most of all, video showcases charisma of live images and animations, allows for transparency and communication skills, which can lead to trust. It is also a good idea to make videos for special occasions as a way of watching them and reminiscing the good times.

Benefits of converting PowerPoint presentations to video
-> Display your presentations in a more vivid way
-> With PowerPoint in video format, it is easy for uploading to blog and websites
-> Even there is no computer, you can also view your presentations
-> Videos can be uploaded to portable devices such as iPhone, iPod and Pocket PC

5 Ways to Convert PowerPoint Presentations to Video (free ways and cost-effective ways)
Method 1: Upload your presentations to http://www.slideshare.netwhich is one of the world’s largest communities for sharing presentations. It can generate video for your presentations.
After uploading your presentations onto it, you can directly download the generated video onto your own computer, or embed the video to your blog.

But there are limitations to the presentations uploaded to it. Max size of the presentation is limited to 100MB; animations, video clips and other complex elements couldn’t be added; PowerPoint 2007 is not supported. Sometimes, objects inserted into the presentation may be modified after the uploading.

Some other similar online PowerPoint sharing sites such as http://www.authorstream.com and http://www.slideboom.com/ also support generate video for the presentations uploaded. The advantage is that you don’t need to download any programs onto your computer and they are all free. If your presentation’s size is not too big, and there are only texts and pictures in your presentation, you can have a try at these sites.

Method 2: Use Camtasia which costs $299 to record your presentation and then generate a video
Step1: In the Task List, select Record PowerPoint.
Step2: Open a PowerPoint presentation to record.
Step3: Select the recording options from the PowerPoint Add-in Toolbar. Click the Record button.
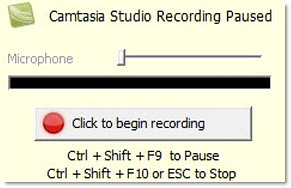
Step4: The presentation opens in presentation mode. A Camtasia Studio dialog opens in the lower right corner of the screen. Click the Click to begin recording button.

Step5: Progress through the PowerPoint presentation slides. To stop the recording before the last slide, press . To stop the recording at the end of the presentation, click Stop recording.
Step6: Enter a file name and location and click Save. The presentation recording saves as a Camtasia Studio recording file.
Advantages with this method: The program can capture slide timing, animations, sound effects, webcam video and any applications displayed on screen during the presentation. You can also record your own narration while the screen-capture process is being carried out.
Disadvantages: This program eats huge system resources. If the configuration of your computer is not so good, animations may become laggy or even lost.

Method 3: Convert PowerPoint presentation to video with Acoolsoft PPT2Video Converter
Step1: Download this PPT2Video Converter and install it on your computer.
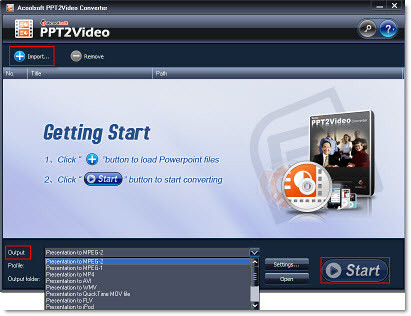
Step2: Launch the program. Click Import button to choose the presentation you want to convert, choose an output format for the video you want to generate. And then click Start button to start the conversion process. (This program can convert presentations to video in MPEG, AVI, MP4, WMV, 3GP, FLV and MOV.)

Step3: Upload the video to blogs or websites such as YouTube.

Method 4: Use Windows Movie Maker to create a video for your presentations
Windows Movie Maker comes with all Windows XP and Vista installed computers. With this method, it may time consuming and animations in your presentation would be lost after the conversion.
Step1: Save your PowerPoint slide show as “PNG” images.

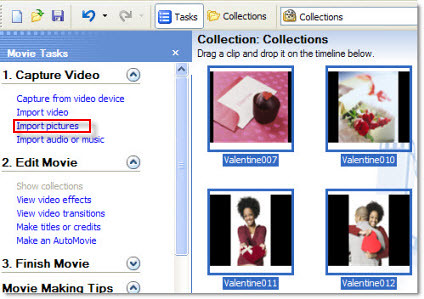
Step2: Import the images to your Windows Movie Maker.
Step3: Select all the imported images and then add them to Storyboard.

Step4: Add video effects to the slides (Optional)
Step5: Save the slide show as Movie File.

Method 5: Make a QuickTime movie on Mac
Export your presentation as a QuickTime movie “PowerPoint Movie”. Then you can save your presentations to MOV video file. Way to do this: click File -> Make Movie
But in this way, sounds and animations couldn’t be retained. If you are using keynote, just export your presentation to QuickTime file directly.

Take the advantages of PowerPoint and video. Convert your presentations to video. Share your presentation with more people and create a more convenient way to view your presentations.

2009年1月15日星期四

Plasma TV Used in School

Today’s children are growing up surrounded by television and video. Visual media is already an essential component of classroom instruction. Especially in recent years, plasma TV sets have been installed in more and more schools with the support from different educational agencies.


These plasma TVs are mostly designed for use in presentations, dynamic messaging, training and teleconferencing. Teachers can present courseware through plasma TVs and also some other types of training material. Students can get the latest school news and view other students’ good job. Thus, contribute greatly to both the teaching process and the construction of campus culture. Students can learn in an innovative way, and school introduces a new way to communicate with students.

Plasma TVs are usually connected to a DVD player, VCR, HDTV decoder set-top box, external audio connections, gaming services, and a PC. In most conditions, school use DVD players and PCs as the media. As a result of this, information that is to be presented through plasma TVs is commonly stored in video or DVD format.

The preparation wok of the material to be broadcasted could be huge and time-spent. If you are the person who has been assigned this task on campus, in which mean you would finish it. Maybe some of you may think that this task is a hard one which requires complex computer skills. Indeed, not everyone has a founded flash, programming skill, but with right tools, you can also make it easy.

Regarding the Powerful function that PowerPoint has, here is a way of how to make a video or DVD based upon it. Below are some advantages of doing so:
-> As PowerPoint is available on almost all computers at school, you don’t need to buy additional content authoring tools
-> PowerPoint is frequently used to prepare for courseware, teachers can operate it easily. No professional computer skills are required
-> Besides texts, you can also insert customized backgrounds, pictures, animations, movies and etc into a PowerPoint. It is ideal to form the content of your video

After you finish form the content of your video with PowerPoint, the next step is to convert it to video formats or burn it to onto DVD discs.
1. Turn the PowerPoint you made to video format, here are two ways for you
-> Use Windows Movie Maker which comes with all Windows XP and Vista installed computer
Step 1: Save your PowerPoint slide show as “PNG” images


Step 2: Import the pictures to your Windows Movie Maker


Step 3: Select all the imported images and add them to the Storyboard


Step 4: Add video effects to the slides (optional)


Step 5: Save the slide show as Movie File


-> Use some professional tools which will make this job easy such as Acoolsoft PPT2Video Converter.BTW, there are many other ways out there of converting your PowerPoint presentations to video, you may find more by searching on Google.

2. Burn the PowerPoint onto a DVD disc:
If your prefer DVD as the media, you may find many tools on Google. I wrote an article about burn PowerPoint to DVD, you can click here to read it. It introduces 5ways for you, including free ways and cost-effective ways.

With the tips mentioned above, I believe creating a video or DVD for your school is not as difficult as you think. Just play the video or DVD on the PC, your information could be viewed everywhere on the campus where the plasma TV is deployed.

2008年12月12日星期五

Christmas ideas – Making Christmas card with PowerPoint and podcast it on YouTube

Christmas is around the corner! Want to wish your dear ones blessings of joy on this special day? Sending elegant Christmas cards may be a good idea. Especially with the development of the Internet, more and more people tend to send electronic cards instead of paper-based ones to their friends and relatives.

Compared to the traditional cards, ecards are lively and more environment friendly. Besides, it is faster to give your wish by sending an ecard than mailing a postcard. As PC computers getting popular in modern life, ecard is easy to be accessed.

There are many web sites online on which you may find thousands of stunning Christmas cards. But many of them are alike, and no one allows you to create your own. How about DIY your own Christmas ecards? It will be more fun and you are allowed to make full use of your imagination to make your own e-card as interesting as possible. Send the most sincere greetings to your dear ones. Now, let me show you the way of making your own Christmas card.

Since MS PowerPoint and Windows Movie Maker are available on most computers, below is a way of how to make a special and lively Christmas card yourself with the help of these two tools step by step.
1. If you want to personalize a video in your Christmas card
You can make use of the free tool Windows Movie Maker which comes with all Windows XP and Vista installed computers. You can either directly capture a video from the video capture device or make one with existing videos, pictures and music. After the video is OK, you can further add effects, transitions and titles to the video. In simply 3 steps, a personalized video will be created.

Below is an example of how to capture a video for your Christmas card with WMM:
 - Click Capture from video device in the Movie Tasks menu
 - In the coming page, you can set the Mic Volume and configure the camera & video settings

 - Click Next. Then you will be able to see a blank needs you to enter a file name for your captured video and the place you want to save it on your computer.

 - Click Next to continue. In the coming page, choose the video setting for your captured video. Choose Best Quality for Playback on my Computer is recommended.
 - Go on clicking Next to the last step. In this page, you can start to capture video by clicking Start Capture, end the capture by clicking Stop Capture.

 - After you have finished capture a video yourself, click Finish to end this process. The captured video will be displayed at the Collection area. Drag it to the video area in Timeline board. If you still want to add other pictures or music to form your video, you can do this by clicking Import Pictures and Import Audio or Music in the Movie Tasks menu. Then drag all of them to the corresponding area in Timeline board below.

Right click each object in the Timeline board. Then you will be able to set the Video Effects and the Play Timeline for them.
 - After you have adjusted all the settings for your video, you can save the video onto your computer by clicking Save Movie File in the File tab.

2. Form the content of your Christmas card with PowerPoint
As PowerPoint allows you to insert customized backgrounds, characters, pictures, animations, movies, and etc, you can take this advantage to make the content of your Christmas card colorful and meaningful. The video you made with Windows Movie Maker can also be inserted into the PowerPoint. Besides, you can input greetings and warm wishes into the PowerPoint.
In this process, you just need to make full use of your imagination to create the e- card.

3. Turn the PowerPoint you made to video format
The last step for making your own e- card is to convert the PowerPoint you made to video format. In this way, you can make your e- card look like a movie and upload it to websites such as YouTube for wide sharing. After that, you can send out your Christmas greetings just with a video or a website link.

Here you can try this tool: Acoolsoft PPT2Video Converter, it is designed to convert your PowerPoint to almost all popular video formats such as MPEG, AVI, MP4, WMV, 3GP, FLV and MOV.
Currently, the company has launched their Christmas sale, each product are sold at a favorable price.

Here are two DIY Christmas cards from YouTube:
http://www.youtube.com/watch?v=7SLY_HfO-pQ&feature=related
http://www.youtube.com/watch?v=yRfvSOuwM_4&feature=related
Interesting? Take actions now, make Christmas ecard by yourself. Send out your warmest and most sincere greetings to your friends and relatives. Have a merry Christmas!

2008年11月9日星期日

Use Product Presentation to Boom your Sale during Christmas

As Christmas is coming, most business men would like to bet their sales fortune on this shopping season. In order to attract prospects at the critical first impression, appealing presentations are important to presenting your products in the best light possible. Especially under such an economic circumstance, using some cost-effective ways to help you promote your product is meaningful.

Why use PowerPoint to help you promote your product:
1. PowerPoint is available on most computers. And with the development of information technology, product presentation has become a powerful ad format for presenting products or for special promotions.
2. You can broadcast your product presentation on big screens in the main streets, on mobile TV, on Internet and so on.
3. Compared to asking an advertising company to make advertisement for you, making PowerPoint ad by yourself may help you save a lot.

As it to how to make an effective product PowerPoint presentation to advertise your product, below are some points that Mark J. Tiedeman points out. (Note: Mark Tiedeman has over 25 years in the high-tech telecommunications industry including 15 years in senior product management and marketing roles. He has served as Vice President of Marketing at Copper Mountain Networks and at Tut Systems and is currently providing marketing and product management consulting services.)

Before starting any product presentation, you should know what the purpose of your presentation is. As a product presentation, the purpose is to enhance the value of the product that is perceived by the audience. Depending on the circumstance, some presentations will be more overt than others in persuasion style.

The next important thing is to fix who the audience is for your presentation. Product presentation audiences can be segmented as follows:
• Within your company: sales, sales engineer, customer support, marketing, product management
• Distribution or solution partner: sales, sales engineer, engineering, support, marketing, manager, executive
• Customer: purchasing, engineering, operations, support, manager, executive. Additionally, customers should be segmented, as appropriate, by market and/or application.
• Investors
• Industry and market analysts
• Media

For more details of how to create an effective product presentation by Mark J. Tiedeman, you can click here: http://www.pragmaticmarketing.com/publications/magazine/4/4/0608mjt

A well-done product presentation is just the first step of making advertisement for your product. To present it in various ways is the final purpose of making the masterpiece. Only in this way, you can make the most of your product presentation and let more potential users get your promotion idea. Finally sell out your product. Regarding this, below I list some most effective ways to help you present your product presentation.
1. Convert your product presentation to video. Then you will be able to upload the converted video to website in the advertising area; broadcast your product presentation on digital signage indoors and outdoors; let people see your promotion on TV within transport vehicles.

Benefits of doing so: Creating video advertisement with PowerPoint yourself is much more cost-effective than asking a third-party company to do that. And PowerPoint is easy to deal with. You can fix the content you want to spread freely.
In order to do this, all you need is a PowerPoint converter that can help you concert your product presentation to video. There are many such tools in the market, but here I would like to recommend some tools that I have experienced and function well. Wondershare PPT to Video and Acoolsoft PPT2Video Converter. They can help you convert your PowerPoint to MPEG, AVI, MP4, WMV, 3GP and MOV that can be accepted by almost all media.

2. Burn your product presentation to DVD. Then you will be able to send a DVD disc to your premium customers and agents to provide them the promotion information.
Benefits of doing so: compared with written promotion documents, DVD promotion slideshow can be accepted more intuitively, as there can be animation, pictures, transitions and even background music, videos in a PowerPoint.

Also, with a DVD disc, your agents can conveniently spread the promotion information to their stuff by playing it on a big screen.
Tool recommended: Wondershare PPT2DVD. With it, you can also create DVD menus for your presentations for quick navigation.

A great product presentation could be the power for your Christmas boom. Use all effective tools and resources as you can to drive up your Christmas business.

2008年10月23日星期四

Tips for making PowerPoint courseware and how to distribute it

In modern education, PowerPoint is frequently used when preparing courseware. A judicious use of this tool helps guarantee a high-quality class. However, if it is used ineffectively, it can obscure teaching content, turn a great lesson into computer chaos. So using PowerPoint courseware effectively in teaching is very important.

Below are some main tips of ensuring a well-designed PowerPoint courseware.
1. Set Your Goals
Before starting any PowerPoint courseware, ask yourself a question, “What is the goal of this lesson?” Goal is the key. You cannot well organize your class without figuring out the goal of a lesson. Many educators suggest using an outline to list clearly what skill or knowledge is being assessed. Brainstorm in mind, and then outline your ideas in PowerPoint.
And, the most important thing, be sure to weigh content heavily in the assessment tool, don’t let style to take precedence over content.

2. Style Matters
Avoid using too many animations, clip art, backgrounds and so on. But keep in mind that a judicious use of those tools can be effective. Below is a research on under which set of conditions people learn best.
• Hearing spoken text and looking at graphics – 91% more learning,
• Looking at graphics alone – 63% more,
• Reading printed text plus looking at graphics – 56% more,
• Listening to spoken text, reading text, and looking at graphics – 46% more,
• Hearing spoken text plus reading printed text – 32% more,
• Reading printed text alone – 12% more,
• Hearing spoken text alone – 7% more.

3. Other tips of creating teaching presentations• Include only 3-7 points per slide and 3-7 words per bullet
• One theme or background; one font set; one text animation effect
• Avoid using complete sentences, using clause instead
• Don’t show all points on a slide at once, otherwise, students will read ahead and stop listening to the presentation
• Challenge students to use pictures in stead of text, initiate talking with students and among students

According to different teaching contents and teaching goals, pay attention to the tips above, I presume doing a successful PowerPoint courseware is not a hard thing.

After creating your wonderful PowerPoint courseware, you may sometimes receive appeals from your students and colleagues to share it, or you want to make your PowerPoint courseware be available online. The next and more important thing is to present and distribute it in a proper way so that more people can benefit from it. In the following, I would like to introduce some ways to help you distribute your PowerPoint courseware well.
1. Directly e-mail your PowerPoint courseware to others
It is a way that many people could think. And it is also easy to operate, just attach the PPT file and then send it to others via e-mail. But in this way, the people who receive it should have a MS PowerPoint installed computer. Besides, the PPT file sent to others could be modified by others.

2. Burn your PowerPoint courseware to DVD/CD
As DVD discs are convenient for sharing. Burning your PowerPoint to DVD/CD will be ideal for distributing your courseware. You no longer need to worry if others have PowerPoint installed or not because DVD discs are supported by most computers and players. You can click here to learn more about how to burn PowerPoint to DVD, and create eye-catching DVD menus for your presentations.

3. Convert your PowerPoint to video/flash, then upload it to website or blog
You may have your own website or blog, upload your PowerPoint courseware to it can make your students and others see your PowerPoint courseware as long as they visit your web page. In order to do this, you will need to convert your PowerPoint to video or flash first. Tools recommended: Acoolsoft PPT2Video Converter, Wondershare PPT2Flash. You can click here to know more about the benefits of converting your PowerPoint to video.

4. Convert your PowerPoint courseware to PDF
PDF is accepted by many people as it is easy to open and can be printed easily. Convert your PowerPoint courseware to PDF is also a good idea to distribute your PowerPoint. You can click here to get the tool to convert your PowerPoint to PDF.

Microsoft PowerPoint is a powerful teaching tool. It can greatly improve the efficiency of teaching. So take the advantages of PowerPoint courseware, make your class more interesting and let more people get your teaching ideas.